
It’s the first of October and I think it’s totally appropriate to whip out those Halloween and fall decorations and get in the spirit! I love decorating for Halloween and I love bedazzling things, so what could be better than bedazzled pumpkins for Halloween?! I found this idea in a magazine a few years ago and decided I couldn’t resist testing the idea out.
Here’s what was on my shopping list at the craft store:
- 4 Different sized fake white pumpkins
- Black & Purple Acrylic Paint
- Silver Spray Paint
- A bag of crystal gems
- Black Gems
- Fake Spiders & leaves
- Precut silver Sparkly letters
- Precut Black Sparkly Design
- Craft Glue (or you can use a hot glue gun)
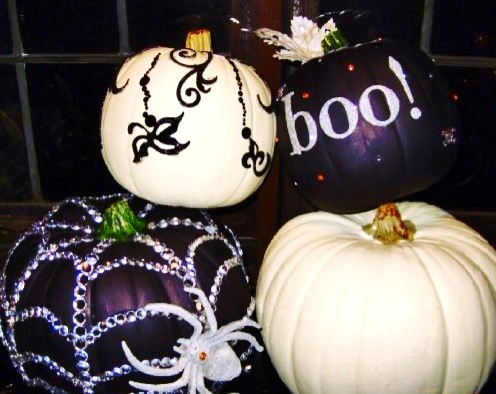
I bought 4 white, fake pumpkins at a craft store. I left 2 white and painted 2 a dark purple. I actually took royal purple and black acrylic paint and mixed them together to make this almost-black-purple. I painted 2 of the white pumpkins with my new color. I also spray painted a fake leaf and a fake spider, silver.

While I was waiting for those to dry, I decorated the white pumpkins that I was not painting. I found a cool precut design on a sparkly card stock that I glued on to look like it was swirling down from the stem of the pumpkin. I also found some black gems that were already stuck in a pattern, and applied them to the pumpkin as well. These do not have to be placed in any specific design but I went with one that almost cascaded down the pumpkin. Let your creativity fly here, they’ll always turn out great! I did leave one white pumpkin plain, which I think looked good with the group of decorated ones.

After the painted pumpkins dried I started applying the crystal gems in the shape of a spider web. To do this, I followed the straight lines of the pumpkin that were already there and then made a curved arch to connect them. This is time consuming and take patience but the end result is worth it! I used my glue gun to glue these on so they instantly stuck. I didn’t want to deal with them sliding around if I used regular craft glue. Once the web was completed, I took my silver fake spider and glued it on to the side to make it look like it was crawling in the web.


On the other pumpkin, I glued the precut silver letters I found, to spell out the word “Boo!” I had also found some Halloween shaped jewels that I placed randomly around the pumpkin. Then I glued the silver painted leaf next to the stem of the pumpkin.


This project is fairly easy, fun and the best part is, with these fake pumpkins, you can use them year after year!
Hope you enjoy & Happy October!
xoxo
Corporate Crafty Chic
